- Grimport Language Documentation
- Installation of Grimport & Other Software
- Variables & Syntax
- Control Structures
- Extract data from a page
- Export Filtered Data
- Programming with Grimport Script Editor
- Crawler and Logs
- GRS, GRC & GRL
- Folder Organization
- Launch Options
- Cache
- Mistakes & Errors
- Connected services
- To Go Further
To Go Further
Graphical elements in the Wizard (//WIZ)
The wizard makes it very easy to create graphical interfaces. Thus it is easier to modify a variable in the script and the fields provided to allow people who are not computer literate to manage the script.
To do this, we will use wizard dialogues that allow variables to be customized and associated with a graphical interface. These all start with //WIZ.
Here are the available wizard dialogues:
//WIZ_VARIABLE to create a field in Wizard for texts, numbers and manage null values
//WIZ_BOOLEAN to create a field in Wizard for booleans
//WIZ_TEXT to create a field in Wizard for multiline texts
//WIZ_LIST to create a field in Wizard for lists
//WIZ_MAP to create a field in Wizard for maps
//WIZ_TITLE to insert a title
//WIZ_COMMENT to insert a comment
//WIZ_LINK to insert a hyperlink
//WIZ_SEPARATOR to insert a separator
//WIZ_CODE < ... // > WIZ_CODE to edit a part of the code
//WIZ_EXECUTE to execute a code to the display of the wizard. You can use Grimport or Java.
//WIZ_NOCACHE_EXECUTE to execute a code to the display of the wizard without the CMS initial cache generation
It is possible to set up graphic comments with tags starting with #. You can name your graphical element with #name. The available tags are the following:
#name:Name of the field. Defines the label of the field#css. Specifies that the field must have a CSS selector which adds help and test options.#regex. Specifies that the field must have a regular expression which adds help and test options.#number. Specifies that the field must accept a number, which forces the conversion of the variable in the code (avoid for example myVar = "1")#text. Specifies that the field must accept a text, which forces the conversion of the variable in the code.#code:myCodeToExecute(). Executes a code, so you can program an action when the user clicks on the element or types a text. It is also possible to program the value that should be in the field. You can use Grimport or Java.#link:http://site.com. Defines the link (for WIZ_LINK)#id:my_element_id. Defines the id of the element. This parameter is used when programming with #code or //WIZ_EXECUTE.
Example of a CSS selector targeting a title:
myCssSelector1 = "h1"; //WIZ_VARIABLE #name:Title selector #css
View in Wizard tab:
![]()
The programmation in comment
Generally a graphic comment generates 2 objects: the label which is a text describing the field and the element which is the input field. If the identifier is my_element_id, then the label will have the identifier label_my_element_id and the element will have the id element_my_element_id. You can find these objects in your code with the getElementById() function.
It is possible to program in the #code and //WIZ_EXECUTE structures exactly as if you were in Grimport. Note that Java is often used because this language is more dedicated to the management of graphic elements.
With #code, you have 3 interactive variables. onClick will allow you to define a closure that will be executed each time the item is clicked. onKey is a closure that will be executed each time a key is typed in the field. Finally output is used to define what should be entered in the field.
If your field does not contain a definition of output, it is added automatically, so #code:25 is equivalent to #code: output=25. If output is a list of values, it will transform the element defined with //WIZ_VARIABLE into a dropdown list:
Example:
mode = "SIMPLE"; //WIZ_VARIABLE #name:The mode of crawling #code:["SIMPLE", "ASSISTED", "MIXED"]View in Wizard tab:

To avoid visual clutter in a script, you can hide part of the code with the comment //HIDE_FOLD. To do this, put this part in a block ( {...} ) and put //HIDE_FOLD in this block.
![]()
A more complete example:
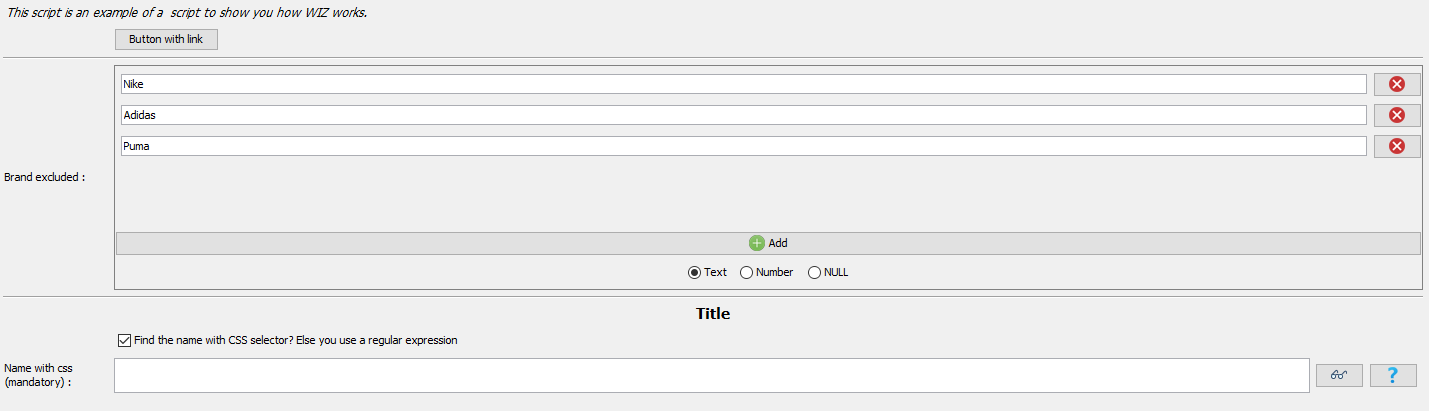
//WIZ_COMMENT This script is an example of a  script to show you how WIZ works.
//WIZ_LINK #name:Button with link  #link:https://idia-tech.com

//WIZ_SEPARATOR

excluded_brands = [ "Nike",  "Adidas", "Puma" ]; //WIZ_LIST #name:Brand excluded #text

//WIZ_SEPARATOR

//WIZ_TITLE  Title
isNameCss  = true; //WIZ_BOOLEAN #name:Find the name with CSS selector? Else you use a regular expression #id:nameCheck #code:onClick={-> idCssField="nameCss";  idRegexField="nameRegex";if(element.isSelected()) {  getElementById("label_nameCss").show();getElementById("element_nameCss").show();  getElementById("label_nameRegex").hide();  getElementById("element_nameRegex").hide(); }  else { getElementById("label_nameCss").hide();  getElementById("element_nameCss").hide();  getElementById("label_nameRegex").show();  getElementById("element_nameRegex").show(); } }; output=null;
cssSelectorName  = ""; //WIZ_VARIABLE #name:Name with css (mandatory) #css #id:nameCss
regexName  = ""; //WIZ_VARIABLE #name:Name with regex (mandatory) #regex  #id:nameRegex


if(isNameCss) name = cleanSelect(cssSelectorName)
else name = cleanRegex(regexName)

brand = cleanSelect(".brand")

if(!arrayContains(excluded_brands, product["brand"]))
{
     function("update_or_add_product",[
        "name": name
     ])
     send()
}

//WIZ_NOCACHE_EXECUTE checkbox=getElementById("element_nameCheck"); if(checkbox.isSelected()) { getElementById("label_nameCss").show(); getElementById("element_nameCss").show(); getElementById("label_nameRegex").hide(); getElementById("element_nameRegex").hide(); }; else { getElementById("label_nameCss").hide(); getElementById("element_nameCss").hide(); getElementById("label_nameRegex").show(); getElementById("element_nameRegex").show(); }
View in Wizard tab:
CLICK TO ZOOM
Next ❯ ❮ Previous